BATH UNIVERSITY SAMPLER ARAN THROW- Crochet Along
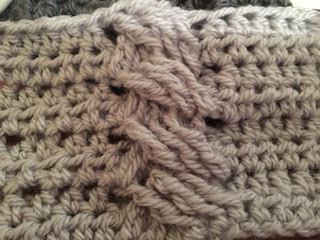
( BUS AT CAL) SQUARE 6 : A 3 by 3 CABLE.
As explained for square 5 I am currently experimenting with silver yarn asd I am waiting for the graphite grey yarn to arrive so here is the pattern for a chunky bold cable square in case you cannot wait to carry on - like me!!!
Abbreviations and way of working are on the first few posts for this CAL- see square 1.
In a way the method is similar to the cables in square 1 but there are 3 strands to cross-over instead of 1 and in this design the rows worked on the wrong side have been kept simple by just working HTr.
Such a bold chunky cable deserves pride of place so the sides have been kept very plain and simple, but you could add'' tramlines''of FPTr going straight up if you so wished?
In that case you would have 2 HTr, then 1 FPTr, 1 HTR, 1FPTr and then1HTr before starting the cable.
I have chosen to work 6 HTr at either side of this cable.
Foundation row: with 6 mm hook chain 18 , change to 5 mm hook and ch 2.
Row 1: HTr across with 5 mm hook from 3rd ch from hook.( 18 sts)
Row 2: ch 2, work 6 HTr , skip 3 stitches, work 1 FPDTr into 4th stitch , then 1 FPDTr into 5th stitch, and 1 FPDTr into 6th stitch, going back to the skipped stitches in the row below: work 1 FPDTr into the first skipped stitch, 1 FPDTr into the second skipped stitch, 1 FPDTr into the 3rd skipped stitch, THEN counting across the last set of HTr in the row below, work the last 6 HTr in the row below by crocheting 1 HTr into each of those final 6 stitches. ( 18sts).
Be very careful here that you do not work into the top of HTr stitches that lie within or behind the cable, this is why it is often best to count the row below from the end backwards for 6.
Row 3: ch 2, work 1 HTr into each of the 18 stitches of row below.
Row 4 : ch 2 and work 6 HTr into the first 6 sts. Now work a FPDTr and do it around the post of the FPDTR in row 2 once you have skipped/ missed the next 3 FPDTrs, so it's a long reach across to the left. do 2 more FPDTr around the next 2 posts of the FPDTr in row 2 on the far left , that's half the cable done. Now for the tricky part: you now have to work 3 FPDTr around the posts of the FPDTR in row 2 that you missed/ skipped, starting at the far right and working leftwards one at a time.
When you have done that you work the final 6 HTr to finish the row.
Row 5,7,9,11,13 - as row 3. Then fasten off.
Row 6,8,10, 12 are like row 4 except you go round the post of the FPDTr of the'' relative row below'' rather than going back to row 2 each time.
So row 6 uses FPDTr posts in row 4, row 8 uses posts in row 6 and so on.
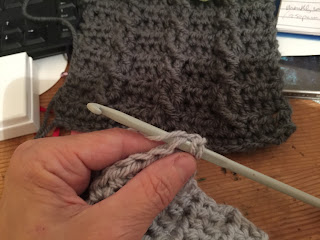
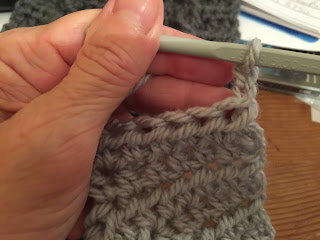
Here are a few more photos to show the working of this cable:
This is what the ''wrong'' side looks like...
This is the working of a HTr at the start of a row.

This is the look of one completed HTr.
This is an entire odd row: 18 HTr on the wrong side.
This is the 2 ch Turning chain in the photo above.
This is the row of 6HTr on the right side before tackling the cable.
This shows the double wrap or YO before inserting the hook for the first FPDTr.
This shows where to insert the hook for the first FPDTr in a cable section . It us at the top section of the FPDTr in 2 rows below.... having skipped the ones that slant to the right which lie below.
This shows a partly completed first FPDTr....There's 2 more yarn overs to go before this stitch is completed.
Now it is completed and we'll do the next one to the left of it.
Showing the insertion of the second FPDTr with the double wrap and loop on hook as well.
There are 3 more yo/pull throughs to go on this stitch as shown in this state.
That's two out of the three that will lean to the right completed... the first two FPDTr of the cable.
Now inserting for the third FPDTr.... as above.
Halfway there, the first 3 FPDTr completed, now it gets trickier...
Reaching UNDERNEATH you now connect to the 3 FPDTr below that were missed.
It is easier if you hold it up and fold the crochet fabric a bit. the enxt 3 FPDTr are going to slant to the left and lie over the ones you have just made.
When you have made three of these it looks like the above?
The first 3 you made are at the left and look like they are slanting left but they will turn in a minute and go the opposite way. the ones on the right in the photo above are number 4, 5 and 6 and will slant to the left as soon as they are ''anchored'' by working the next HTrs...
This is counting the 6 HTr from the end, shown by their little V's at the top of each stitch, then working the HTr into the 6th stitch,
This is the end of an EVEN numbered row.
Good luck and let me know how you get on????


No comments:
Post a Comment