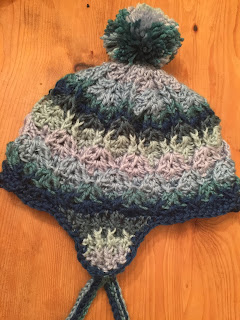
This is an adaptation and amended existing pattern so I will only describe the adjustments and then you'll need to acquire the pattern to do the rest but the cowl is all mine so a full pattern for this is below.
The hat started off as the Moonstone hat in the magazine ''Crochet now'' Issue 11.
Crochet now can be found on facebook, pinterest, instagram and issues can be acquired from practicalpublishing@subscription.co.uk.
This is the original hat, the ribbed section did not work out for me, did not suit.
For the hat I have used 122 grammes of a smooth aran weight yarn ( UK terms), which I had lying around in my stash.
I followed the pattern to about row 15 except for stopping any increases by row 9 as my hat was getting too big for me
and used a 5 mm hook throughout.
By row 9 the first truly pale green row in the hat above I have:
{1 front post treble ( slanting away from the inner shell pattern), 2 Trebles, 1 chain, 2 Trebles( this sequence is the inner shell pattern for this row), 1 front post treble/FPTR ( slanting)} this group is repeated exactly 12 times.
And that includes the the start of the row group which starts with a slanting 3 chain as the ending front post treble of a group before starting the next {..} group.
The groups form diamonds outlined by post trebles and with inners of shells which start small, increase and then decrease again.
In the green section the inner consists of 4 rows but after that all diamonds are only 3 rows long.
These 3 rows are defined by :
row 1 : FPTR, 1 Tr, 1 ch, 1Tr,1 FPTR
row 2: 1 FPTR, 2 Tr,1ch, 2Tr, 1 FPTR
row 3 : 1FPTR, 1Tr, 1ch, 1Tr,1FPTR.
the adjacent diamonds decrease when the above increase and vice versa and that's all I think I can say.
I finished at 16 rows in navy on a widest inner diamnd row with the FPTRs sides of a diamind lying adjacent to the FPTRs of the next diamond shape.
These inner shells for the scallop border.
At the back I have 5 scallops clear I used 2 for the earflap, there are 3 scallops clear at the front and then there's the next earlflap across 2 scallops. ( 12 scallops in total).
Working the EARFLAP:
Over 6 rows I used 3 colours: deep green, pale green and pale blue.
Row 1 over 12 stst:
1dc, 1 HTR, 1HTR,1TR x 6, 1 HTR,1HTR,1dc and turn. each of these stitches is into one stitch, the 6 Tr are 1 treble in each stitch of the scallop ( NOT 6 in one st)
row 2: ch1, skip first st, dc in next stitch, ( 1FPTR, 1BPTR) 4 TIMES then a dc and a ch and slipstich to close row. the FPTR / BPTR is a standard ribbing pattern.
row 3 : pale green- attach yarn and work a dc, work the appropriate FPTR or BPTR to continue the ribbing pattern over the central 6 sts, then a dc and a ss to turn
row 4: 1 ch ( counts as dc), ribbing over 6 sts, dc in last stitch ans turn.
row 5 as row 4 but in pale blue.( 8 sts)
row 6: ch , then dc 2 together , ribbing over central 3 sts, dc 2 tog and slip stitch to close.
Repeat for other earflap.
Finish: dc all around edges: round the scallop brim edge and around the earlflaps as one round, 1 loose dc in each stitch, tighter in the corners and loosely around the curve of the earflaps or add a few extra stitches so the edge stays lying neatly flat.
I made 2 size pom poms with the CLOVER pom pom maker: 6.5 mm for the top and 2 of 4.5 mm for the ends of the cords.
CORDS: these are 28 sts chained with 5 mm hook and then I have gone back up and down slip stitching all the way until I had a width/thickness I liked.
( 2-4 times)
Sew in ends, sew on the pom poms and attach the cords or if crocheted directly onto the hat, finish cords and attach pom poms to ends.
COWL PATTERN TO MATCH HAT: 142 G ARAN YARN AND 5 MM HOOK.
COWL: this weighs 142 grammes and measures 72 cm in the round and is 25 cm high.
There is scope to put a drawstring in the top edge if you want is more warm and snuggly than this.
Again I am just using remnants of aran yarn so I ran out of the blue and only had a little deep green left and this is seen in the repetition of the stripes.
It is almost the same aran and shell pattern but I wanted my diamonds crisper than in the hat where the FPTRs lie adjacent and then diverge again, I wanted mine to cross and make a neat point.
My cowl is 18 ROWS
the photo below is only a section of it the completed one is at the end.
Chain 986sts loosely, or use a 6mm hook , then change to 5mm and slip stitch closed to start the pattern
Set up ROW1:ch 3 ( counts as a TR), then work a TR in the next chain, now comes the repeating pattern: * skip 1 ch, work 2 Tr in the next ch, work a ch, work 2 Tr in the next ch ( bigger shell made), skip 1 ch and work 1 Tr in each of the next 2 ch**.
Repeat 15 times until you have 16 large shells between lined of 2 Tr, you omit the last 2 Tr as the are at the beginning, close with SLIP STITH( ss).
ROW 2: ch 3 and work a FPTR round each of the 2 trebles in row below, work the 2 TR, 1ch 2Tr shell into the 1 ch space of the shell below, then work a FPTr onto the next treble and repeat that.
So you now have a large shell into the ch space of the same shell in the row below and all trebles are sanding proud and they now have FPTRs on them. Close with a ss, I prefer to hide the 3 ch and work FPTRs on all trebles that need it pushing the 3 ch to turn into the lining as it were, but you can count it as a stitch if you prefer.
ROW 3: ( this is where we start the slanting parts): 3 ch , 1FPTr round the 2nd treble,*** work a 1TR- 1 ch - 1 TR shell into the 1 ch chainspace and work FPTR onto the next treble, NOW
working into the space between this and the next treble work a 1TR-1ch-1TR shell and then work the FPTR onto the next treble. This makes the FPTrS SLANT.
Then you repeat this all around and close with ss, You should have 16 complete repeats which are starting to look like standing triangles or wigwams?
ROW 4: THIS is where we make the POINTS!
Ch 3 and start to work a FPTR onto t trble at the left side of an expanding section, i.e. a treble which slants to the left but do not FINISH the FPTR, before completion, part work a FPTR onto the adjacent treble slanting to the right and finish them together : an 2 FPTRTOG.
They will have a single v at the top showing the are joined stitches, 2 into 1.
THIS IS your POINT.
then work a 2Tr-1ch- 2TR shell into the chainspace of the next shell ( the expanding shell section) and repeat the 2 FPTRTOG with the next 2 trebles. Repeat all around and you close with a ss and you will have 16 pointed wigwams?! With expanding diamonds starting up in between?
Now the pinted section of the triangle also signifies the widest part of the diamond section so these will now decrease and the slanting will go the other way.
ROW 5 is a repeat of row 3 except that you work the FPTRs round the peak of the wigwams and each 2 such FPTRs are separated by a shell: 1Tr- 1 ch-1 Tr which is worked into the
top v which joined the FPTRs, you have to look behind and dig a little but it's obvious enough?
the next shell 1Tr- 1ch-1Tr is worked into the ch sace of the bigger shells below, thus decreasing one diamond and starting others alongside.
Row 6 is like row 4 except you will see that the points are moved over a bit to create those defined diamond shaped spaces which are each filled with 3 rows of shells.
a small shell, a larger shell and then a small shell again.
And that's it.
Repeat until you like the height and finish or keep going , like I've stated mine is
18 rows.
If you want to have it closed near the top, wear it upside down and chain a drawstring to be threaded through the ch spaces in the set up row?! A cordcan be threaded nicely between the paired trebles and through the shell chain spaces.
VOILA I hope you like it and that this will keep you snug and warm this winter and many winters to come!


